روش اتصال مخزن هواگیر به کمپرسور هوایی چگونه است؟
مقدمه — چرا اتصال صحیح اهمیت دارد
اتصال مخزن ذخیرهسازی هوا به کمپرسور هوا شما صرفاً بستن دو لوله به یکدیگر نیست؛ بلکه فرآیندی حیاتی است که بر عملکرد، ایمنی و بازدهی تأثیر میگذارد.
مخزن ذخیرهسازی هوا هوای فشرده را ذخیره میکند و نوسانات فشار را کاهش میدهد که این امر پایداری سیستم را بهبود بخشیده و عمر کمپرسور را افزایش میدهد. بهعنوان یک سازنده حرفهای با 10+ سال سابقه ، YCZX میداند که اتصال صحیح چقدر برای عملکرد و ایمنی حیاتی است. ترجمه چینی در ادامه آمده است.
راهنمای گامبهگام برای اتصال صحیح
در اینجا دنبالهای واضح و کاربردی برای اتصال ایمن و مؤثر مخزن ذخیرهسازی هوا ارائه شده است:
🔹 ۱. انتخاب مکان مناسب
مخزن ذخیرهسازی هوا را در نزدیکی کمپرسور قرار دهید.
اطمینان حاصل کنید که فضای کافی برای نگهداری و تهویه وجود دارد.
در صورت نصب در فضای باز، از دستگاه در برابر عوامل جوی محافظت کنید.
🔹 ۲. استفاده از اندازه و مواد مناسب برای لولهکشی
قطر لوله را با ظرفیت کمپرسور و مخزن تطبیق دهید.
از انحنای تیز اجتناب کنید — از لولههای بدون درز و با دیواره ضخیم استفاده نمایید.
مواد معمول: فولاد کربنی / فولاد ضد زنگ .
🔹 ۳. نصب اتصالدهنده انعطافپذیر
لولههای انعطافپذیر یا جاذبهای ارتعاش، تنش و انتقال ارتعاش بین کمپرسور و مخزن را کاهش میدهند.
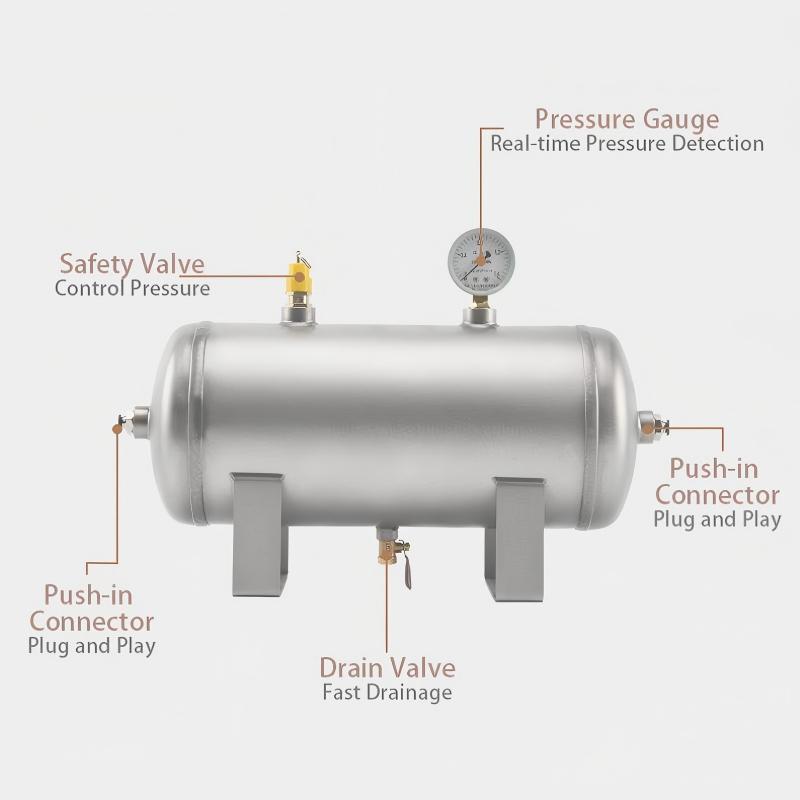
🔹 ۴. افزودن اجزای ایمنی
شیر قطع جریان: برای جدا سازی در زمان نگهداری
شیر چک جلوگیری از جریان معکوس
متر فشار مانیتور کردن فشار مخزن
کلید امنیتی آزادساز تخلیه فشار اضافی
🔹 ۵. رعایت جهت نصب و جهت جریان
مطمئن شوید هوا بهدرستی از کمپرسور → مخزن → ابزار/سیستم جریان یابد. معکوس شدن جهت جریان میتواند باعث آسیبدیدگی شود.
🔹 ۶. آزمون و بازرسی
بعد از نصب:
✔ آزمون فشار
✔ بررسی نشت (با محلول صابونی)
✔ نظارت در ساعات اولیه راهاندازی
نکات از متخصصان
💡 همیشه دستورالعملهای سازنده را دنبال کنید.
💡 از بیشبستن ر threads خودداری کنید — از آببند رزوهای استفاده نمایید.
💡 اگر مطمئن نیستید، تماس YCZX — ما مخازن را بهصورت سفارشی ساخته و لوازم جانبی مانند پمپها، موتورها و کمپرسورها را ارائه میدهیم.

